|

| |
|
Fender Vibrato Pull Switch Kit |
| This kit is designed for
all Fender blackface and silverface amps from 1963 through 1981 with
Vibrato, except for the Bronco, Princeton, Princeton Reverb, Showman
Amp, or VibroChamp. Remember that you must have a footswitch connection to
the vibrato footswitch RCA jack on the back panel - or at least a
shorting plug such as our FSP-100 (included in the kit). If you are using a
footswitch, make sure that the footswitch is working properly.
A bad footswitch, bad footswitch cable, or a dirty connection to the RCA
jacks is often the cause of loss of vibrato. Note:
The Vibro Champ, Princeton and Princeton Reverb amps do not need the
footswitch for vibrato operation. These three models
are the exception; all other Fender models from the blackface and
silverface era must have a footswitch connection for vibrato to operate.
Also, both the reverb and the vibrato cables must both be
connected to the proper jacks on the rear of the amplifier in order for
vibrato to function, as the vibrato footswitch receives its ground
connection from the reverb connection.
|
| Use all safety precautions in working
inside the amplifier chassis.
Tube amplifiers
contain high voltage which is stored in the filter capacitors even after
the amplifier has been turned off.
Always unplug the amplifier from commercial power, and discharge all
filter capacitors before working on the amplifier circuitry. If you
are unsure about this procedure, we strongly recommend that you leave
your amplifier in the care of a professional service person.
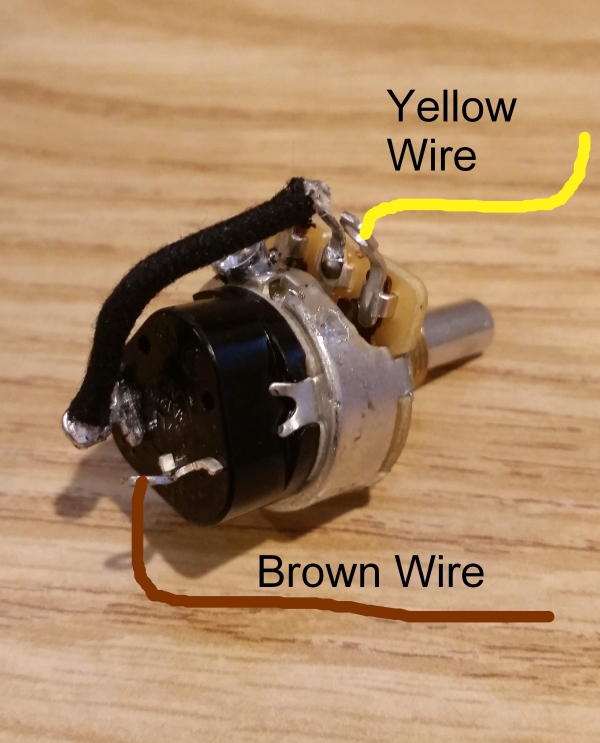
Unsolder the two wires
from the Vibrato Intensity pot (pot closest to the amp's pilot light).
These should be a yellow wire on the outside terminal and a brown wire
on the center terminal. Remove the knob by loosening the set
screw, and remove the nut holding the vibrato intensity pot, and remove
the pot from the amplifier.
Install the new
pull-switch pot, with the lock washer on the inside of the chassis.
Tighten the nut on the front panel. Install the knob on the
pot shaft, and adjust the position of the knob so that the "1" is
straight up when the pot is turned all the way down. Tighten
the set screw of the knob.
Solder the yellow wire to the outside
terminal of the new pot as shown. Solder the brown
wire (formerly on the center terminal of the old pot) to the open switch
terminal on the back of the new pot.
We recommend at
least sliding the chassis back into the cabinet before powering up and
testing for vibrato operation, to avoid the possibility of electrical
shock.
Make sure the FSP-100 plug is
inserted in the vibrato foot switch jack on the rear, or your footswitch
cable is inserted in the jack. Pull out the vibrato
intensity knob and adjust the intensity. Push in the knob to
eliminate the vibrato effect. |
 |
|
Strat™, Stratocaster™, Esquire™, Telecaster™, Tele™, Jazzmaster™, Jaguar™, Mustang™, P.Bass™, J.Bass™ and Fender™ are registered trademarks of Fender™ Musical Instruments. The replacement necks and bodies are for a Fender™ or Squier™ by Fender™ guitar or bass. The distinctive headstock designs and the distinctive body designs of the Stratocaster™, Telecaster™, J.Bass™, P.Bass™ and Tele™ Bass are registered trademarks of Fender™ Musical Instruments Co.
Peavey™ is a registered trademark of Peavey™ Electronics Corporation.
Marshall™ is a registered trademark of Marshall™ Amplification Plc.
Mesa Boogie™ is a registered trademark of MESA/Boogie™ Ltd.
AmpRepairParts.com and Studio Sound Electronics are not affiliated with these companies.
All company names, logos and product names mentioned on these pages are trademarks of their respective owners.
Copyright ©2024 Studio Sound Electronics - All Rights Reserved
Not responsible for web site errors or omissions |
|